CO2 Emitter Nozzle Installation
CO2 attracts mosquitoes and increases trap captures. A CO2 emitter nozzle disperses the CO2 evenly around the trap entrance. This procedure explains how to attach the nozzle to one of the supports that hold the sensor's sun hat.
Preparation & Requirements
- CO2 emitter nozzle.
- CO2 tubing.
- 2 × Cable ties (2.5 mm to 4 mm wide).
- Cutting pliers or scissors, to trim the cable ties.
- CO2 source.
Disconnect the power from the sensor and close the CO2 supply before you start.
Do NOT attach the nozzle to the support that carries the antenna cable. The cable ties could damage the cable or reduce the signal.
Installation
Phase A: Positioning the Nozzle
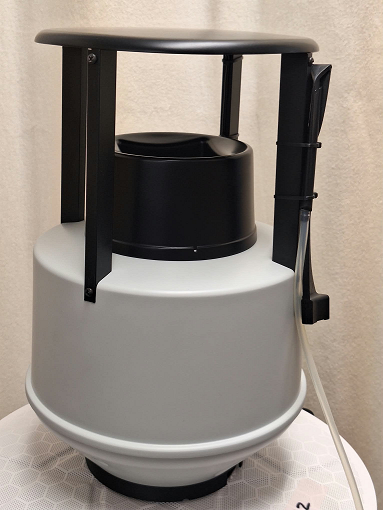
- Choose a support: Choose any of the supports that hold the sun hat, except the one that carries the antenna cable.
- Place the nozzle: Hold the nozzle vertically against the outer face of the support, with the tubing connection pointing down (see Fig1).
Phase B: Fixing the Nozzle
-
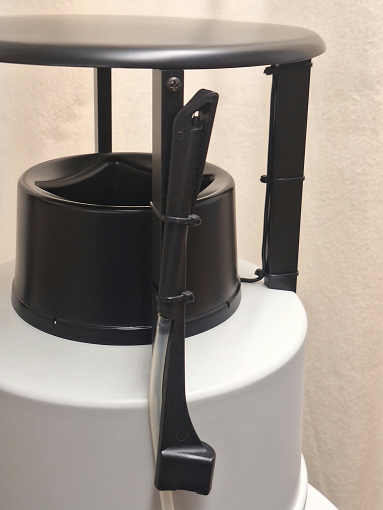
Fit the first cable tie: Pass a cable tie around the nozzle and the support, near the top of the nozzle, and tighten it.
-
Fit the second cable tie: Pass a second cable tie around the nozzle and the support, lower down, and tighten it (see Fig2).
-
Check that it is secure: Make sure the nozzle does not move or turn on the support.
tipTighten the cable ties firmly, but do not crush the nozzle or the tubing. The CO2 must flow freely.
-
Trim the cable ties: Cut off the excess ends of the cable ties.
Phase C: Connecting the CO2 Supply
- Connect the tubing to the nozzle: Push one end of the CO2 tubing onto the nozzle connection.
- Route the tubing: Run the tubing down along the side of the sensor. Keep it away from the trap inlet and the catch bag.
- Connect the CO2 source: Connect the other end of the tubing to the CO2 source.
- Open the CO2 supply and connect the power to the sensor.
Follow the instructions from the nozzle and CO2 source manufacturers for the gas supply and flow rate.