VecTrack Importer
VecTrack Importer brings recordings in and pre-filters them. The window has four tabs: Lab, Field, Delete and Sync. Below the tabs are the run options, the Run and Stop buttons, two progress bars and a log with the live output of each step. Help (top right, or F1) opens this guide.
By default VecTrack Importer only downloads and pre-filters. It runs the mosquito detectors only when you tick Run the detectors (see Run options).
Your name and the log
When VecTrack Importer opens, it asks for your name (the last name used on this computer is proposed, the same one as in VecTrack Curator). It is shown in the title bar. The window does not open without a name.
Every step that is run (download, test pulses, test noise, pre-filter, detectors) and every folder deleted adds a row to data/import/import_log.csv: date and time, your name, the action, the folder, its details (period, time zone, options) and the result (OK, failed or stopped). The name is also written in the download_summary.txt of each download. Open the log in Excel to see who did what and when.
Lab tab — pre-filter laboratory datasets
The Lab tab lists the folders of data/import/lab. Laboratory datasets are copied there by hand.
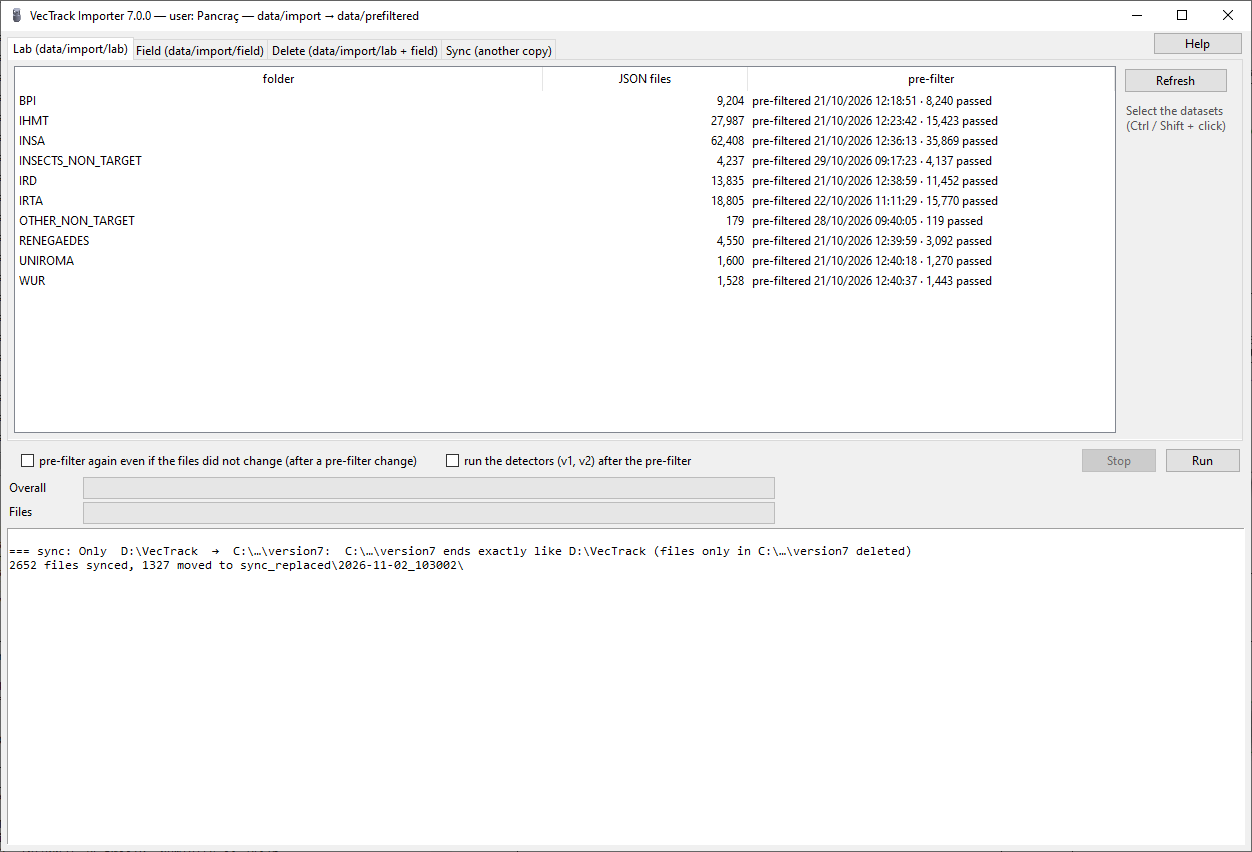
| Column | Meaning |
|---|---|
| folder | Dataset name |
| JSON files | Number of recordings in the folder |
| pre-filter | When the folder was last pre-filtered and how many recordings passed, or not pre-filtered |
To pre-filter datasets: select one or more folders (Ctrl / Shift + click), then press Run. Press Refresh if you have just copied a new dataset.
Field tab — download devices from the server
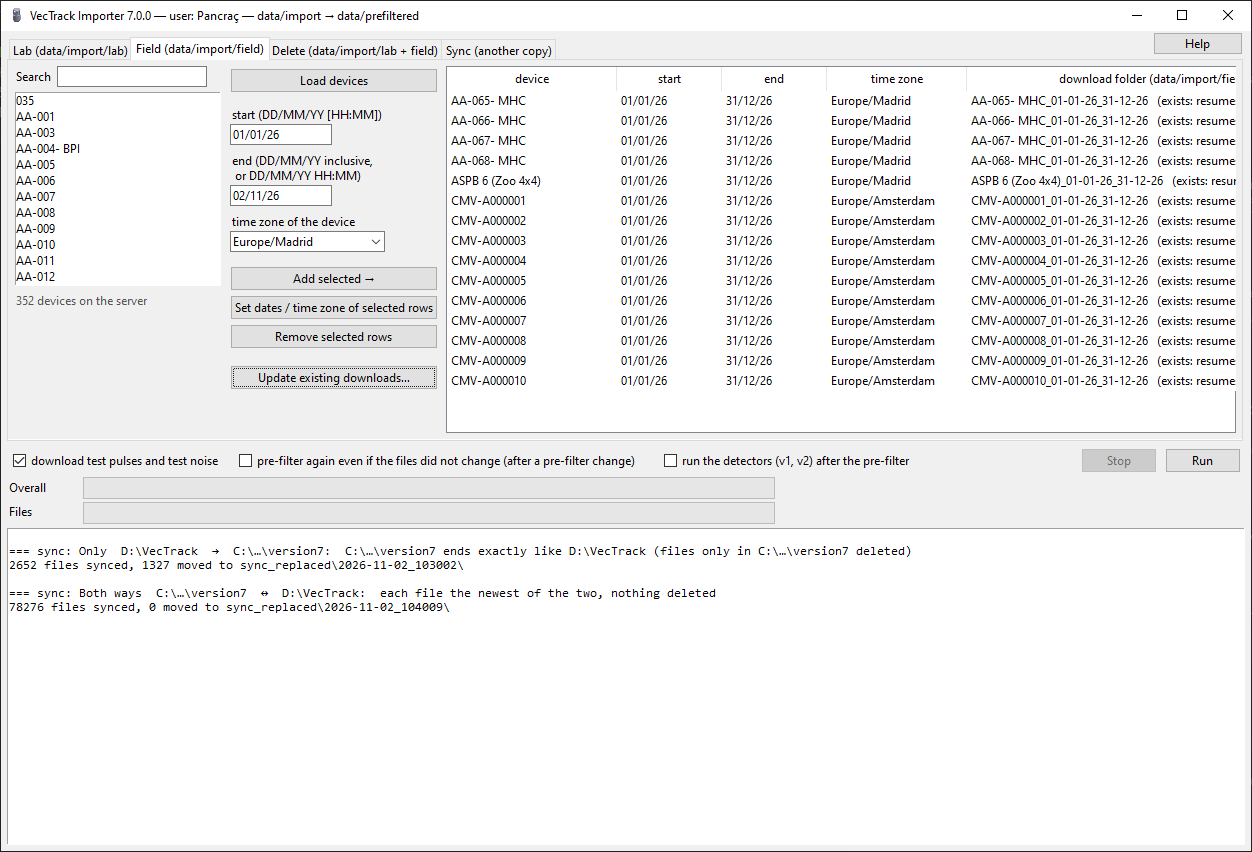
- Press Load devices to fetch the list of devices from the server. Type in the Search box to narrow it down. The server key is read from
config\secrets.jsonnext to the applications, so nothing has to be typed. If that file is missing, the application asks for the server key: enter the key you were given; it is kept only while the window is open and never saved. - Enter a start and an end and the time zone of the device (default Europe/Madrid). Dates and times are the local ones where the device is installed. Two forms:
- a date, DD/MM/YY: the start date from 00:00, the end date included (the whole day);
- a date and a time, DD/MM/YY HH:MM: from the start time up to the end time (not included). For example, start
20/10/26 18:00and end22/10/26 08:00downloads two nights.
- Select one or more devices and press Add selected →. Each device goes to the table with the dates you entered.
- To give some devices other dates or another time zone, select their rows, enter the new values and press Set dates / time zone of selected rows. Each device can have its own date range and time zone. Remove selected rows takes rows out of the table.
- Press Run.
For each row, VecTrack Importer:
- downloads the device's recordings for that period into
data/import/field/<device>_<DD-MM-YY>_<DD-MM-YY>(with times,<device>_<DD-MM-YY-HHMM>_<DD-MM-YY-HHMM>). If the folder already exists, the download resumes and only the missing files are fetched; - downloads the device's daily test pulses and test noise (optional, see below). They describe the state of the optics and the background noise of the sensor;
- pre-filters the folder;
- runs the mosquito detectors (optional, see below).
The table shows, for each row, the download folder and (exists: resumes) when part of it is already on disk.
Updating a download (for example, a yearly folder every month)
- Press Update existing downloads…. A window lists the downloads already on disk with their time zone, the last recording downloaded and whether their period is still open (its end date has not passed). The open ones are selected.
- Change the selection if needed (Select all, or Select open periods to go back to the open ones) and press Add selected to the table. Each download goes back to the table with its own device, dates and time zone.
- Press Run. Only the new recordings are downloaded; the folder is then pre-filtered again.
- In VecTrack Curator, press Refresh (or open the folder again): the new recordings are added for review, and the recordings already reviewed keep their labels.
Run options
| Option | Use |
|---|---|
| Download test pulses and test noise | Field tab only. On by default. VecTrack Curator uses the test noise to tell how far each wingbeat stands above the sensor's noise. |
| Pre-filter again even if the files did not change (after a pre-filter change) | A folder whose files have not changed since its last pre-filter is skipped. Tick this option to pre-filter it again anyway, for example after the pre-filter itself was updated. |
| Run the detectors (v1, v2) after the pre-filter | Off by default: reviewing in VecTrack Curator does not need them, and they take time. When ticked, the detectors run on each folder after its pre-filter, also when the pre-filter skipped it because nothing changed. The results go to results/detection/production. |
Progress
| Bar | Shows |
|---|---|
| Overall | Progress of the whole run: the steps finished plus the share done of the current one. The text gives the step number, its name and the total time. |
| Download / Pre-filter / Test pulses / Test noise | Progress of the current step: files downloaded (target first, then non_target, each with its own total, e.g. 1 100 / 1 621 target files downloaded), files pre-filtered or days of test signals, with the percentage and the time spent in the step. |
When a step has not reported a count yet (connecting to the server, listing files), the second bar moves from side to side: the step is running, but its length is not known yet. Downloads are counted per page of 100 files, so the bar can pause for a few seconds on a large page while the step time keeps running.
Stop ends the current step and skips the remaining ones. If an action of the window fails, a message shows the error. When the run ends, a summary lists any step that failed; its details are in the log. A pre-filter step is also reported as failed when no recording of the folder passed the pre-filter.
Delete tab — free disk space
The Delete tab lists every imported folder, laboratory and field. The run options, Run / Stop and the run progress bars are hidden in this tab.
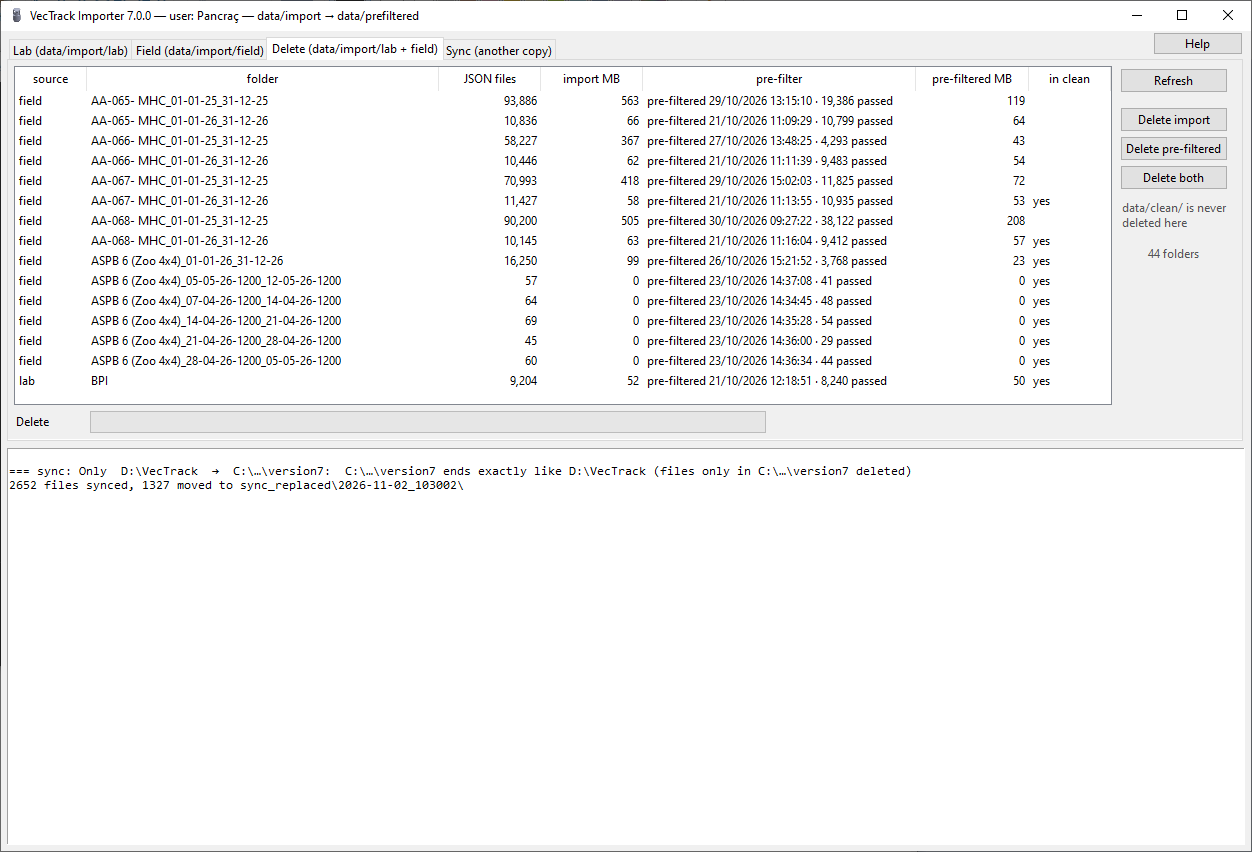
| Column | Meaning |
|---|---|
| source | lab, field, or — for a pre-filtered folder whose import was already deleted |
| folder | Folder name |
| JSON files, import MB | Size of the imported folder |
| pre-filter | When it was pre-filtered and how many recordings passed |
| pre-filtered MB | Size of its pre-filtered copy |
| in clean | yes when VecTrack Curator is reviewing it |
Select one or more rows and press:
- Delete import — deletes the imported folder (
data/import/labordata/import/field); - Delete pre-filtered — deletes its pre-filtered copy (
data/prefiltered); - Delete both.
A confirmation lists the folders, the number of files and the size before anything is deleted. The folders are then deleted in the background, with their own Delete progress bar.
Files are deleted permanently, not moved to the recycle bin. A field import can be downloaded again; a laboratory import only comes back by copying it again from its source.
The review work of VecTrack Curator (data/clean) is never deleted from this tab.
Sync tab — keep two copies the same
The Sync tab keeps this copy of the data (the one of this window) and another one — for example the data disk and this computer — the same, folder by folder. Nothing is copied until you press Sync.
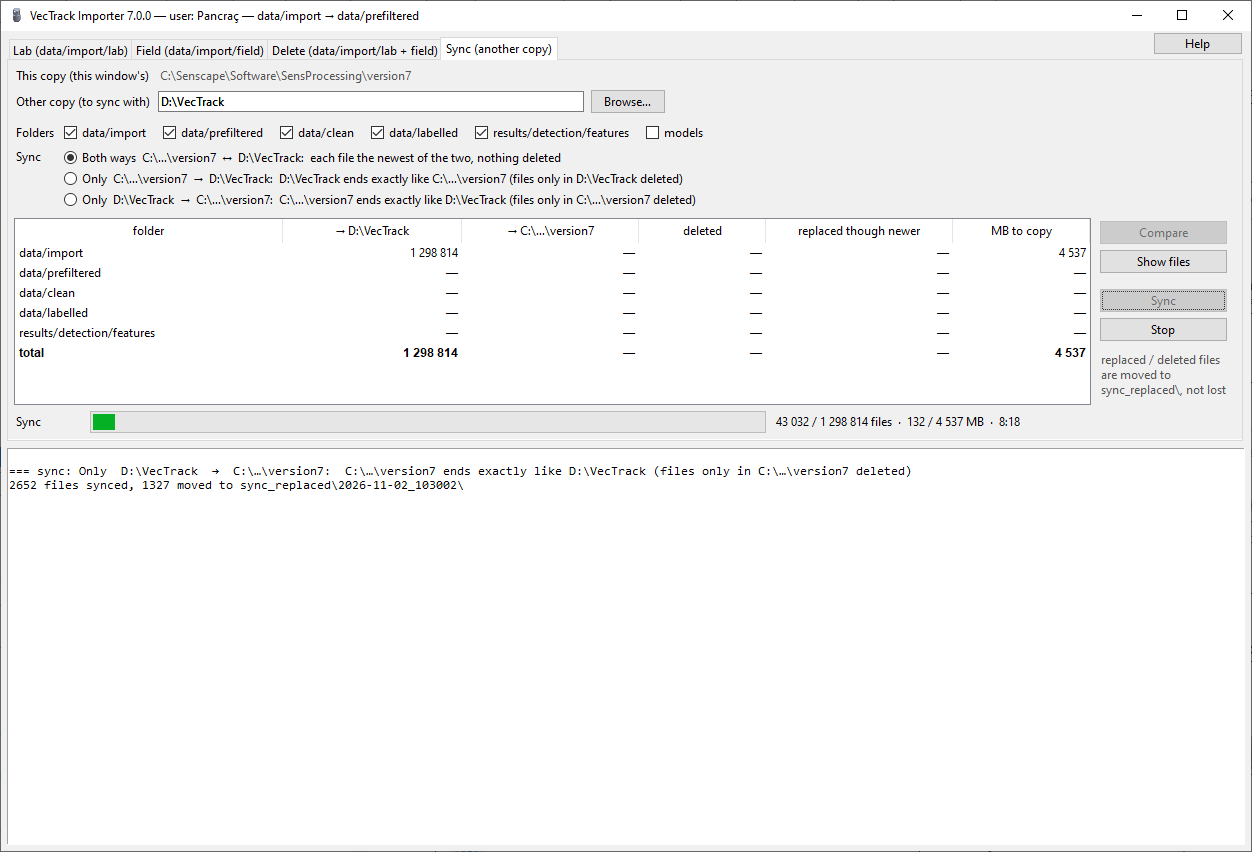
- Other copy: the folder of the other copy, the one that holds
data,resultsandmodels(Browse…). It is remembered on this computer. - Folders: the folders to sync —
data/import,data/prefiltered,data/clean,data/labelled,data/manual_counts(the mosquitoes counted by hand in field sensors),results/detection/featuresand, only when ticked,models. - Sync: how to sync, with the two copies by name:
| Mode | Result |
|---|---|
| Both ways (default) | Each file ends as the newest of the two copies. Nothing is deleted. |
| Only this copy → other copy | The other copy ends exactly like this one: files only in the other copy are deleted. |
| Only other copy → this copy | This copy ends exactly like the other one: files only in this copy are deleted. |
- Press Compare. The table shows, per folder, the files to copy each way, the files to delete (orange) and the files that would be replaced by an older version (red, replaced though newer: edited in the destination after the last sync). Show files lists them one by one in the log, the red ones first.
- Press Sync and confirm. The bar shows the files and MB copied; Stop ends after the current file.
:::tip Which mode? If you worked only in one copy (for example on the data disk over the weekend), use Only that copy → the other one: files you moved in VecTrack Curator (from doubtful to target, for example) are also removed from their old folder. Both ways never deletes, so a moved file would end up in both folders. Use Both ways when both copies have changes to keep. :::
Close VecTrack Curator in both copies before syncing data/clean or data/labelled: it writes to data/clean.
Nothing is lost: a file that a sync replaces or deletes is first moved to sync_replaced/<date time>/ of its copy, with the same folders as the original, and can be put back by hand. Delete that folder when the result is checked. Each folder synced adds a row to data/import/import_log.csv.