VecTrack Curator
VecTrack Curator is used to review the pre-filtered recordings of a folder one by one and decide what each one is:
| Label | Meaning |
|---|---|
| target | a mosquito |
| non_target | another insect or a false trigger |
| doubtful | not enough information to decide, for example a periodic wingbeat with almost no body shadow. Doubtful recordings are kept out of the exported datasets. |
Help (top right, or F1) opens this guide.
Your name
When VecTrack Curator opens, it asks for your name. It is shown in the title bar and saved with every label you give, so that it is always known who reviewed each recording. The window does not open without a name. The last name used on this computer is proposed, the same one as in VecTrack Importer.
Expert mode
On copies prepared for independent review, VecTrack Curator runs in expert mode: the title bar says expert mode (detector hidden) and nothing of the automatic detector is shown — no confidence columns or filters, and no why or detector line in the data panel. This keeps your labels independent of the detector's opinion. The signal indicators and the conclusion, which come from measurements of the signal, are still shown.
Opening a folder
Choose a folder in the Folder list at the top. It lists every pre-filtered folder, laboratory and field, including those pre-filtered while VecTrack Curator is open. Refresh reads the folder list again and reloads the open folder, copying any recordings added to it since.
The first time a folder is opened, VecTrack Curator asks for confirmation and copies its recordings to the review area (data/clean/<folder>). The pre-filtered data are never changed. If new recordings are added to the pre-filtered folder later, they are copied the next time the folder is opened. Every recording that passed the pre-filter is listed, at any temperature; one outside the temperature range a detector version was trained on gets an estimated confidence, marked ~ (the panel says ESTIMATE); outside 5–40 °C the detector does not evaluate it (rejected). Use T min / T max to narrow the list.
Initial labels:
- field folders keep the label given by the server (target or non_target);
- laboratory folders start with every recording as target.
When a folder is opened, VecTrack Curator also measures every recording of the sensor in the background. This takes from a few seconds to about a minute for large folders.
The window
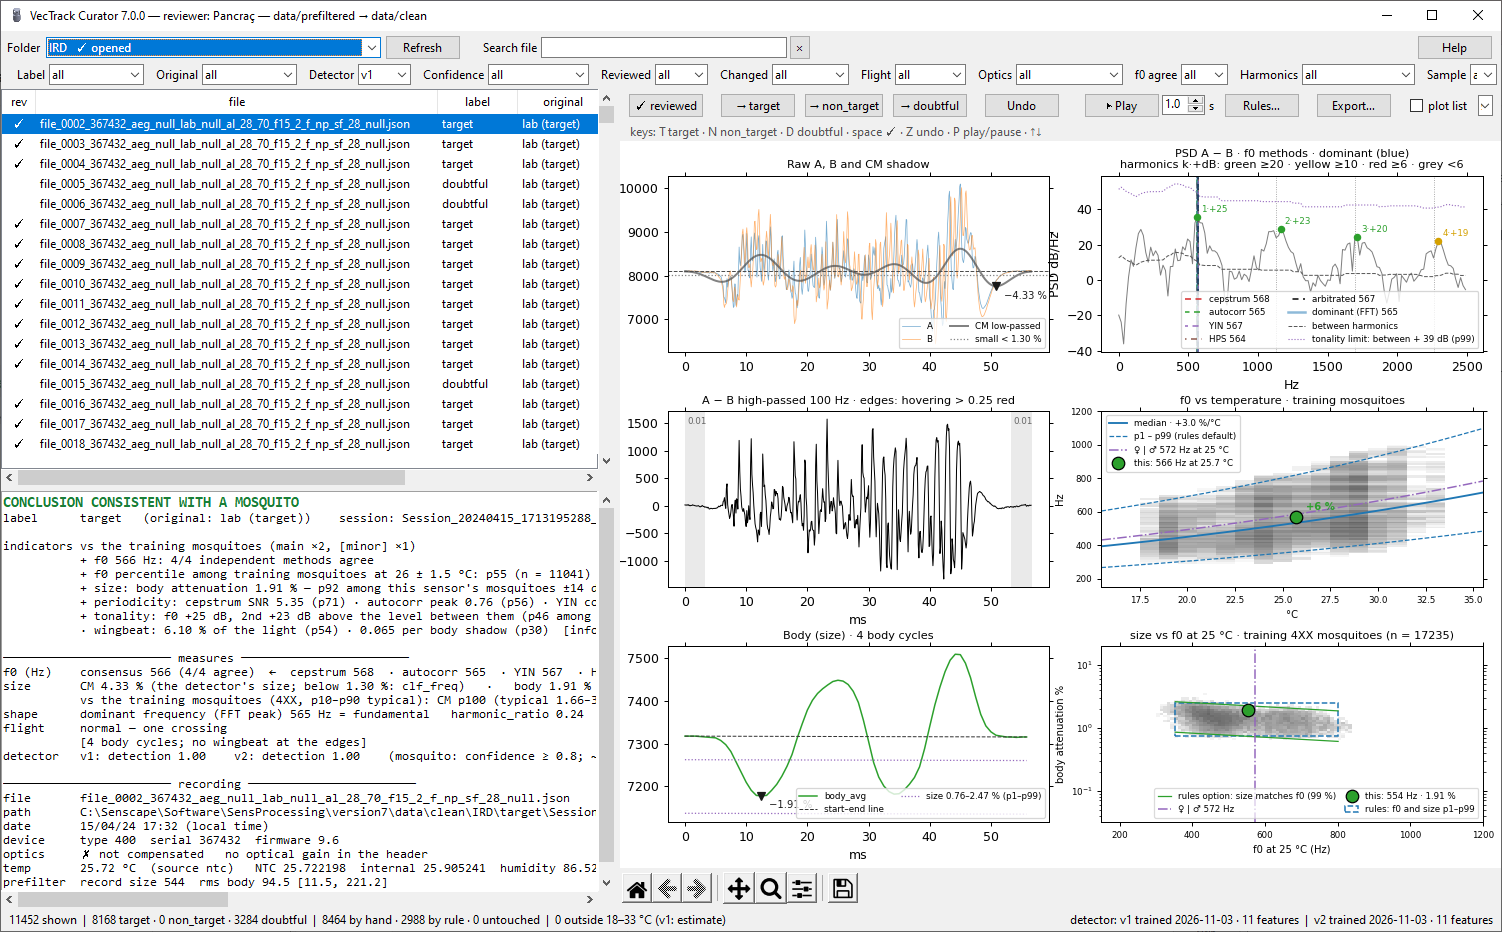
The folder, the file search and Help are on the first row, the filters on the second. The recording list is on the left; on the right are the review buttons, the plots and, below them, the data panel. The list and the data panel have scroll bars, so long file names and long lines can always be read in full. If an action fails, a message shows the error.
Filters (top)
| Filter | Shows |
|---|---|
| label | Current label: target, non_target, doubtful |
| original | Label at the start of the review (server target / non_target, or lab) |
| detector and confidence | Detector version and its confidence: all, ≥ 0.8, < 0.8, agreement (label and detector agree), disagreement, not detected, or estimate (temperature outside the range the detector was trained on: all of them, or those ≥ 0.8) |
| reviewed | All, yes, no |
| flight | How the insect went through the beam (see below): normal, double, short, hovering |
| optics | All, compensated (signals corrected for the optical gain of each channel: field firmware 9.8 or later, lab firmware 12.0 or later), not compensated. Like flight, it fills in once the folder's background measurement is done |
| f0 agree | How many of the four f0 methods (cepstrum, autocorrelation, YIN, HPS) agree on the wingbeat frequency: 4, 3, 2 or 1. Four agreeing is typical of a mosquito; 1 or 2 points to an uncertain f0 (octave errors, weak wingbeat, several insects). It comes from the detector's results: with no detector run on the folder no recording is shown |
| harmonics | How far the f0 peak and the 2nd harmonic stand out above the level between the harmonics, with the colours of the spectrum plot (green ≥ 20 dB, yellow ≥ 10 dB, red ≥ 6 dB). Each option is exactly one pair of colours: 2 green, green + yellow, 2 yellow, yellow + red … down to 2 grey (grey: below 6 dB or not found); together they hold every recording. Then tonality ≤ p99 and tonality > p99, the tonality condition of Rules (above what 99 % of the training mosquitoes reach: a pure tone, rather a machine or another insect than a mosquito). The values are the ones the Rules use; the first time in a folder they are computed in the background, with the progress in the status bar |
| sample | A fixed random sample (5 %, 10 %, 50, 100 or 200) of what the other filters leave, for quality control. It is the same sample every time. |
| changed | Groups of recordings by who labelled them: by hand, by rule or untouched |
| T min / T max | Temperature range. It is applied when you press Enter or leave the field. |
| Search file (top bar, next to the folder) | Part of the file name. Several names separated by spaces or commas show any of them. The list follows as you type; with one match the recording opens. Esc or × clears it. It works together with the other filters. |
Recording list
The list shows, for each recording: ✓ when reviewed, file, current label, original label, flight type, temperature, the confidence of the detector version chosen in the filters (none in expert mode) and the recording date in the local time of your computer. The signal-to-noise ratio is not a column: it is in the data panel and in Rules. Click a column header to sort, and use the arrow keys to move through the list. Columns keep their width: scroll sideways to see a long file name.
Plots
The plots in time are in the left column, one under the other on the same time axis: zoom one and the others follow, so you can see whether the wingbeat starts and ends with the body shadow. The right column has the spectrum and the measures.
| Plot | Shows |
|---|---|
| Raw channels (left, top) | The two optical channels A and B, with the body (dashed) and the body shadow — the dip caused by the insect's body as it crosses the beams |
| A − B (left, middle) | The difference of the two channels, high-pass filtered: the wingbeat signal |
| Body (size) (left, bottom) | The body signal, the reference its dip is measured against and the deepest point: the body size |
| Spectrum (right, top) | Power spectral density of the wingbeat signal (0–2500 Hz), with the fundamental wingbeat frequency (f0) found by each method as dashed lines, the dominant frequency as a wide blue line, and the harmonics as dotted lines |
| f0 vs temperature (right, middle) | The training mosquitoes, the f0 range of Rules (it follows the temperature), the ♀ | ♂ line and this recording's f0 at its temperature. The temperature axis covers the training mosquitoes, this recording and the list's points, with 2 °C more on each side |
| size vs f0 (right, bottom) | The training mosquitoes, the default limits of Rules, the ♀ | ♂ line and this recording's size and f0 at 25 °C |
| power vs f0 (right, bottom, chosen with the selector next to plot list) | Instead of the size: the wingbeat power (% of the light) against f0 at 25 °C, for the training mosquitoes of the same device group (grey) and this recording, marked ✓ or ✗ compensated. The power depends on where the insect crosses the beam and on the optics, so it separates less than the size: it is shown for information and no rule uses it |
The ♀ | ♂ line is the wingbeat frequency at 25 °C that best separates females (slower) from males (faster) among the training mosquitoes, all species together. It is recomputed from the training data each time VecTrack Curator starts.
Two buttons below the plots add views (both off by default):
| Button | Shows |
|---|---|
| plot list | Every recording of the list (with the filters applied) as small dots in f0 vs temperature and size vs f0, coloured by their current label. Useful to see whether a folder's targets sit with the training mosquitoes |
| time plot | A separate window with the folder's recordings per day (per hour when the folder covers 3 days or less), by current label, and the sensor temperature (daily mean and min–max band). A red line marks the selected recording: a mosquito on a day when hardly any other was recorded deserves a second look |
Data panel
The panel below the plots describes the selected recording: file, labels, date, device, firmware, optics, temperature, detector result and confidence, relative body size, wingbeat frequency and signal shape.
The flight line tells how the insect went through the beam, from the cycles of the body signal (the lenses give a crossing a down-up-down-up pattern) and whether the insect was already or still beating its wings at the start or end of the recording:
| Flight | Meaning |
|---|---|
| normal | One crossing (3–4 cycles) |
| double | 5 or more cycles: two passes, or two insects |
| short | Fewer than 3 cycles and no wingbeat at the edges: the recording starts or ends in the middle of the crossing, or the mosquito landed on the optics |
| hovering | Fewer than 3 cycles and wingbeat at the start or end: the insect flies in the beam without crossing it |
The body size reads not measurable when there is no level without the insect to measure it against — mostly hovering. On 4XX sensors, ⚠ unbalanced wingbeat under the size means that the wingbeat is much weaker in one channel than in the other (below half): the insect crossed off-centre, or the optics of one channel are weak, and the body size may read smaller than it is. When the body shadow is below the detector's small-body limit, the size line says small body for the detector: the detector then decides without the body size. It is not a label of its own: a small mosquito is a target like any other.
It ends with two parts that help you decide:
- why — the three measurements that pushed the detector most towards its decision;
- indicators and CONCLUSION — the recording compared with known mosquitoes at the same temperature and, when available, with mosquitoes already confirmed on the same sensor. Each indicator is marked + (mosquito-like) or − (atypical). The conclusion is consistent with a mosquito, doubtful or unlike a mosquito.
The conclusion is a guide for the review, not a classifier: the decision is yours.
The status bar shows, at the bottom left, how many recordings of each label were reviewed by hand, labelled by a rule or left untouched, and how many recordings of the folder lie outside the temperature range of the detector version chosen in the filters (their confidence is an estimate) or outside 5–40 °C (not evaluated); not shown in expert mode. At the bottom right it shows the detector models in use, with a warning when the folder's detector results are older than the model.
Reviewing
| Button | Key | Action |
|---|---|---|
| ✓ reviewed | space | Keep the label and mark the recording as checked. On a recording that already has ✓, takes the ✓ back (Undo puts it back) |
| → target | T | Label as mosquito |
| → non_target | N | Label as non-target |
| → doubtful | D | Label as doubtful |
| Undo | Z | Undo the last action of the session (not of the selected recording) |
| ▶ Play | P | Start or pause Play (see below); Escape stops it |
↑ / ↓ | Previous / next recording |
The keys are listed under the buttons. After each label, the next recording of the list is selected. Giving a recording the label it already has (for example T on a target) confirms it, like ✓ reviewed. The keys do not act while you are typing in a field.
A recording counts as reviewed once you have labelled it or marked it ✓. Every action is written to the folder's review log, so a review can be stopped and resumed at any time.
Play — go through a list quickly
▶ Play shows the recordings of the list one after the other, each for the number of seconds in the box next to the button (1 s by default, 0.5–10 s). The time counts from when the recording's plots are drawn.
- Press
T,N,Dorspacewhile a recording is shown to label it: the next one comes at once. - If you press nothing, the recording keeps its label and is marked ✓ reviewed when its time runs out (
Ztakes it back). - Play stops at the end of the list, with
P,Escape,Zor the button (⏸ Pause), when you open another folder, or when you leave the window (a dialog or another program).
It suits lists where most recordings are expected to be right, for example the targets with high confidence and four agreeing f0 methods: you only press a key on the ones that are not.
Rules — label many recordings at once
Rules… labels all the recordings not reviewed yet in one go. A recording becomes target when it meets every enabled condition and its flight is normal:
| Condition | Meaning |
|---|---|
| f0 range at 25 °C | The wingbeat frequency lies within the range. The range is given at 25 °C and adjusted to each recording's temperature, because insects beat their wings faster when it is warm. The default range covers the known mosquitoes. |
| min agreeing f0 methods (of 4) | How many of the four frequency estimators must agree on f0 |
| flight | Only a normal crossing becomes target. A recording that meets every other condition but whose flight is double, short or hovering becomes doubtful, for you to check: it may be a mosquito, but its frequency or size cannot be trusted alone |
| body size | The body shadow lies within the range of known mosquitoes |
| size matches f0 (off by default) | Size and wingbeat frequency fit together as in mosquitoes: a slow wingbeat goes with a bigger body (females), a fast one with a smaller body (males). Checked apart, f0 and size make a box in the size vs f0 plot whose corners big and fast and small and slow hold no mosquitoes, only other insects; this option keeps only the green band along the mosquitoes, which still holds the % of training mosquitoes you give (99 % by default) |
| periodicity | The wingbeat is regular enough |
| signal | The wingbeat is at least 10 dB above the sensor's noise |
| temperature | The temperature of the recording lies in the range. By default the T min / T max of the main window |
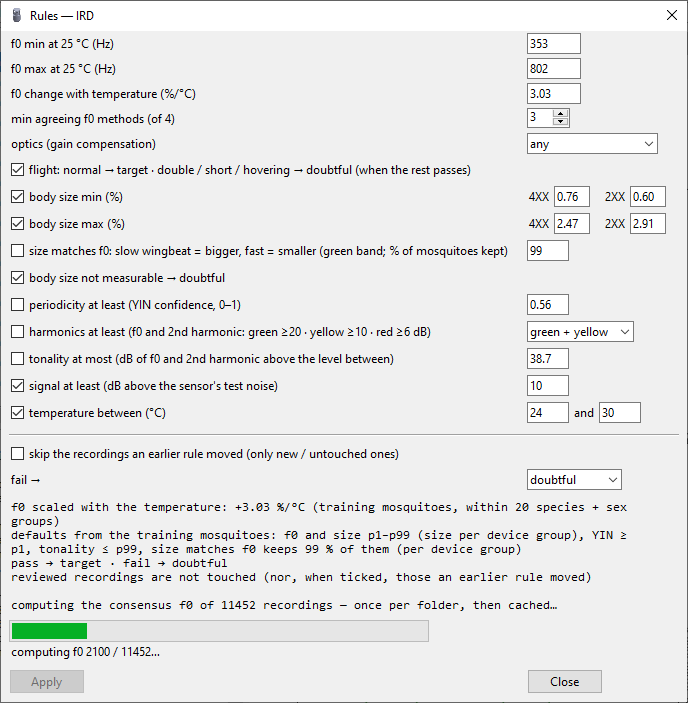
The recordings that fail a condition become non_target (field folders) or doubtful (laboratory folders). The dialog previews how many recordings will move before you press Apply. The first time, the frequencies of the folder are computed, with a progress bar.
Recordings labelled by a rule are not counted as reviewed, so you can apply a rule again with other values. The last option, skip the recordings an earlier rule moved (off by default, below a line: it is not a condition), leaves those as they are; tick it after new recordings were added to a folder so that the rule labels only the new ones. Off, the rule is redone on every recording not reviewed by hand. Undo takes back the whole rule. To check what a rule did, combine the changed filter with sample.
Export — create labelled datasets
When the folder is reviewed, press Export…:
- Enter a dataset name and the test %, the share of recordings kept apart for testing. The test %, the labels ticked (target, non_target or both) and their only ✓ checked boxes (export only the recordings you marked as reviewed) start as the folder's last export (shown next to the test %), or 20 %, both labels and no only ✓ checked for a folder never exported.
- The dialog previews how many recordings and blocks go to training and to test.
- Press Export.
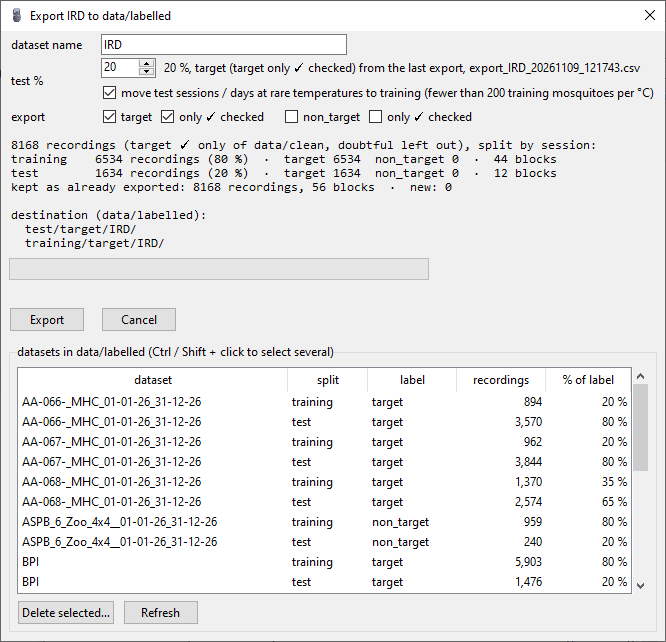
The targets and non-targets are copied to data/labelled/training/<label>/<name> and data/labelled/test/<label>/<name>. Doubtful recordings are left out.
The split keeps whole blocks together: a laboratory session, or a day of a field sensor (a local day in the time zone chosen for the device when it was downloaded). This way the test data never share a session or a day with the training data. The split is reproducible and close to the requested percentage for each label.
When the dataset already exists (a re-export, for example after new recordings were added), every session or day already exported keeps its split: a session that was in training stays in training, one in test stays in test. Only the new sessions or days are split, so that the test data stay recordings the detector was never trained on and the test results remain comparable. A block of mosquitoes at a temperature where the training data have fewer than 200 mosquitoes per degree goes to training, so that rare temperatures widen the range the detector is trained on (for a block of 4XX sensors, the 4XX mosquitoes count). This applies to new blocks and, with the option move test sessions / days at rare temperatures to training (on by default), to blocks already in test as well: they leave the test data. For a block of 4XX sensors only the 4XX mosquitoes are counted, because detector v2 learns from 4XX sensors only: at 20 °C, for example, there are plenty of mosquitoes from all sensors but few from 4XX ones. The preview shows how many recordings were kept, how many new ones went to training and how many moved from test to training.
If a dataset with that name already exists in data/labelled, the Curator lists its folders and asks whether to replace it. Answer Yes to delete the old dataset and copy the new one (if the copy fails, the old dataset is kept). Answer No to copy nothing; you can then export under a new name.
Below, the dialog lists the datasets already in data/labelled: one row per dataset, split (training / test) and label, with its recordings and % of label, the share of the dataset's recordings of that label in that split (training + test = 100 %). Click a column header (dataset, split, label, recordings, % of label) to sort by it; click it again to reverse the order (▲ / ▼ in the header). Delete selected… deletes the selected folders after asking (Ctrl / Shift + click to select several).