User Screen
Purpose
Provide tools for managing users within a Senscape Viewer account, including user roles, invitations, account access permissions, and Telegram notification groups.
Description
The User Screen enables administrators to manage membership of the current account. Administrators can invite new users, assign roles, enable or disable account access, monitor invitations, and manage Telegram notification groups used for system alerts.
Access
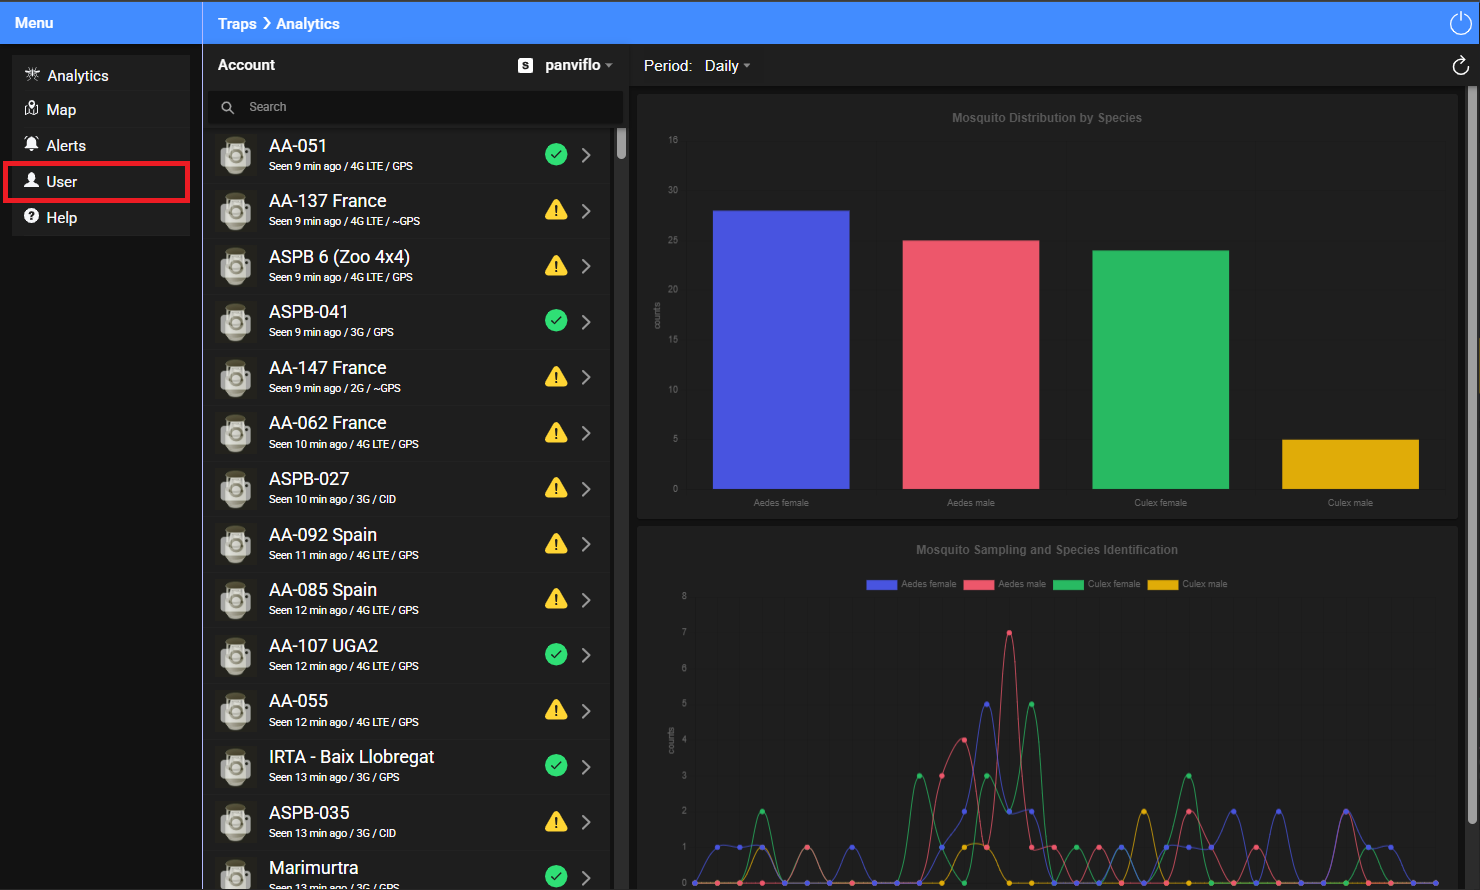
From the Overview Screen, select User from the Main Menu.
Users are managed within the context of a Senscape Viewer account. An account represents the organization or customer environment where sensors and users are configured. Administrators can add users to the account, assign roles, restrict sensor visibility using Restricted Tags, and enable or disable account access. Each user belongs to the account and is granted permissions according to their assigned role and visibility restrictions.
Main Components
- Summary Panel: Displays detailed information about the selected user's account profile, including account membership, assigned role, and Telegram notification group configuration.
- Main Menu:
- Members: Displays all users associated with the current account. Administrators can view user information, manage account access permissions, assign roles, and enable or disable account access.
- Invite Member: Allows administrators to send an invitation to a new user, allowing them to join the current account with an assigned initial role.
- Invitations: Displays pending and accepted user invitations and allows administrators to monitor invitation status and resend invitations when required.
- Notification Groups:
- Create Notification Group: Allows administrators to create a Telegram notification group used for system alerts.
- Delete Notification Group: Allows the Group Administrator to remove an existing Telegram notification group.
- Ping Group: Sends a test message to the selected Telegram notification group to verify that notifications are delivered successfully.
- Join Group: Allows users to join a Telegram notification group configured for the current account.
Access to the User menu depends on the user's role.
- Administrators can access Members, Invite Member, Invitations, and all Notification Groups functions.
- Guest users do not have access to the User menu except for Join Group, which allows them to join Telegram notification groups configured for the current account.
Summary Panel
Purpose
Provide an overview of the selected user's account profile, assigned role, and Telegram notification group configuration.
Description
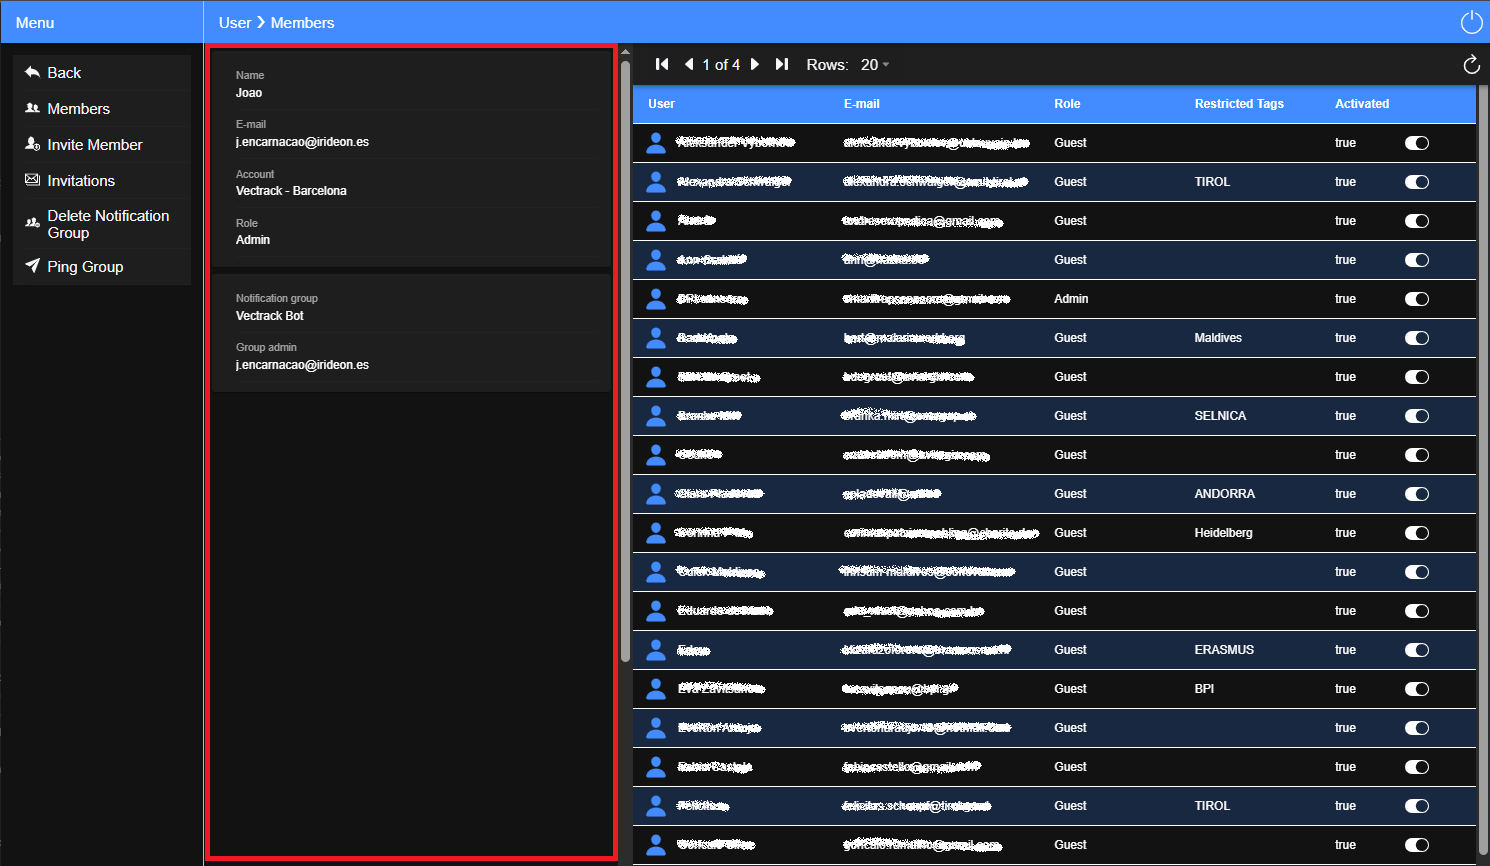
The Summary Panel is located on the left-hand side of the User Screen and displays information about the selected user's account profile within the current account. It enables administrators to verify user identity, review account membership, confirm the assigned role, and identify the associated Telegram notification group configuration when available.
Key Components
- Name: Displays the full name of the selected user.
- Email: Displays the registered email address of the selected user.
- Account: Displays the Senscape Viewer account to which the user belongs.
- Role: Displays the role assigned to the user, such as Administrator, Organization, or Guest.
- Notification Group: Displays the Telegram notification group associated with the user, when configured.
- Group Administrator: Displays the administrator responsible for the associated Telegram notification group, when configured.
Members Panel
Purpose
Provide an overview of the users associated with the current account, including their roles, data access restrictions, and account access status.
Description
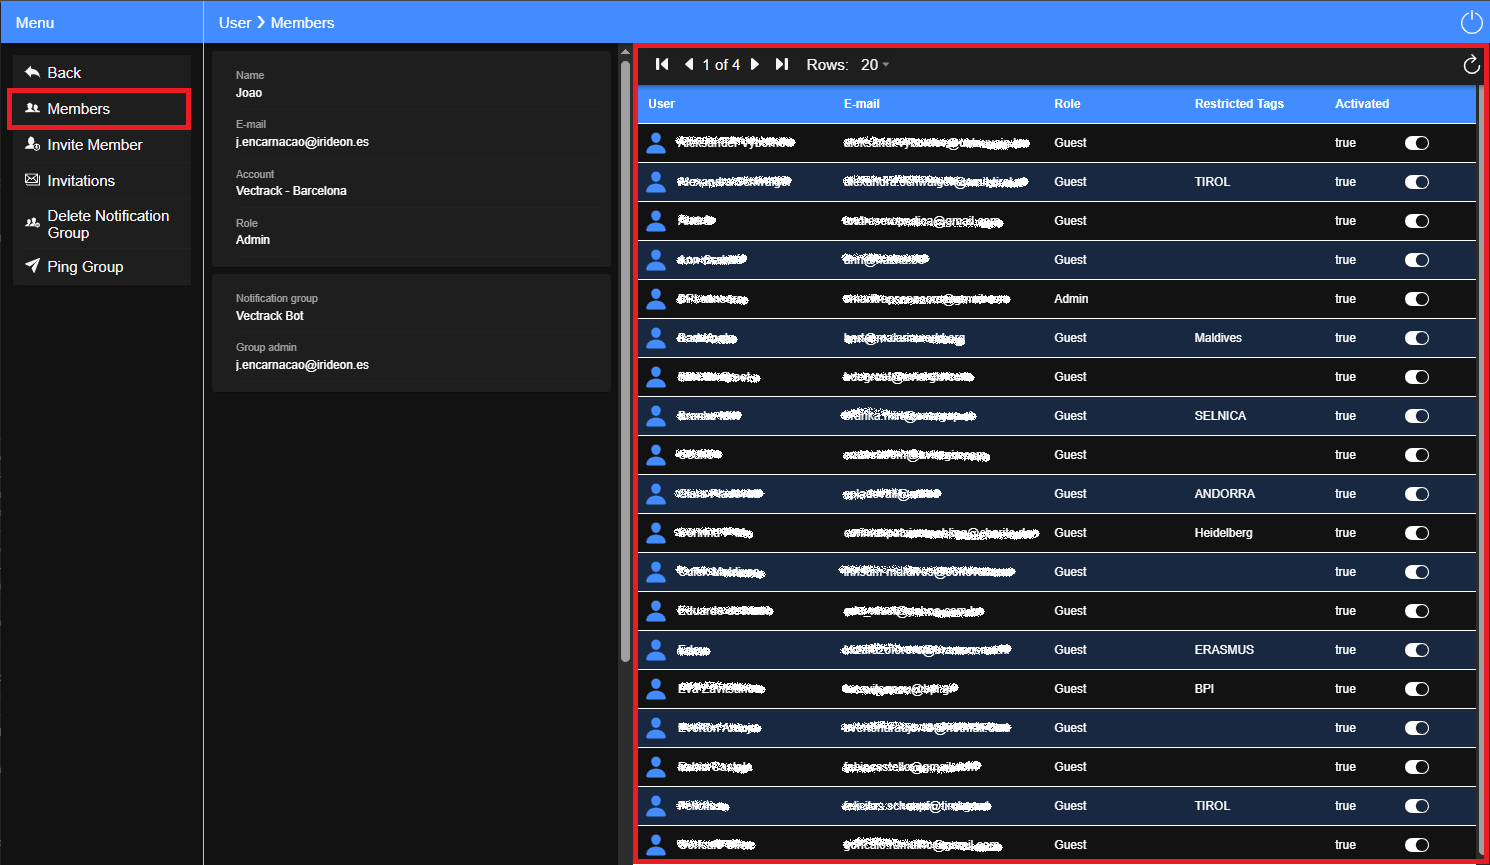
The Members Panel displays a table containing all users associated with the current account and provides administrators with tools to review and manage account access. It enables administrators to verify assigned roles, manage account access, and review visibility restrictions applied through Restricted Tags.
Access
From the User Screen, select Members from the Main Menu.
Key Components
- User Table: Displays all users associated with the current account and provides access to user information and account access status.
- User: Displays the name of the user associated with the account.
- Email: Displays the registered email address of the user.
- Role: Displays the role assigned to the user, such as Administrator or Guest.
- Restricted Tags: Displays the tags assigned to the user that restrict sensor visibility.
- Activated: Indicates whether the user has access to the current account. The value is true when account access is enabled and false when account access is disabled. Administrators can use the associated switch to enable or disable account access.
Restricted Tags are used to control sensor visibility within the current account. Users can access only sensors associated with their assigned Restricted Tags.
Invite Member Dialog
Purpose
Provide a simple interface for inviting new users to join the current Senscape Viewer account.
Description
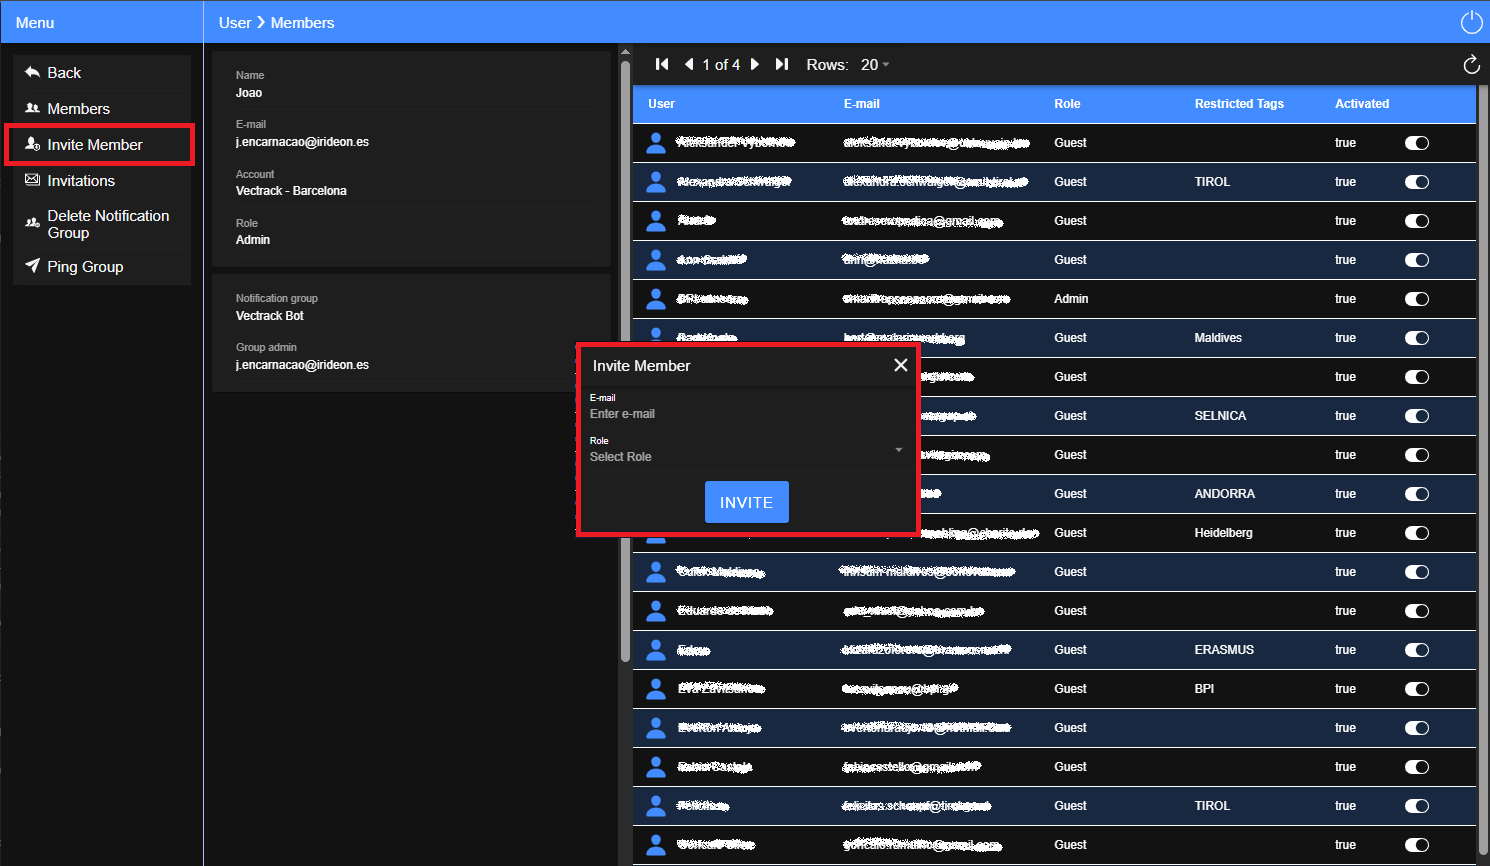
The Invite Member dialog allows administrators to invite new users by email and assign an initial role before the invitation is sent. Once accepted, the invited user becomes a member of the current account with the assigned permissions.
Access
From the User Screen, select Invite Member from the Main Menu.
Key Components
- Email: Allows administrators to enter the email address of the user to be invited.
- Role: Allows administrators to assign the initial role for the invited user, such as Administrator or Guest.
- Send Invitation: Sends an invitation email to the specified address, allowing the recipient to join the current account with the selected role.
A user can belong to multiple Senscape Viewer accounts. Each account requires a separate invitation, and the user can be assigned a different role in each account. For example, a user may be an Administrator in one account and a Guest user in another.
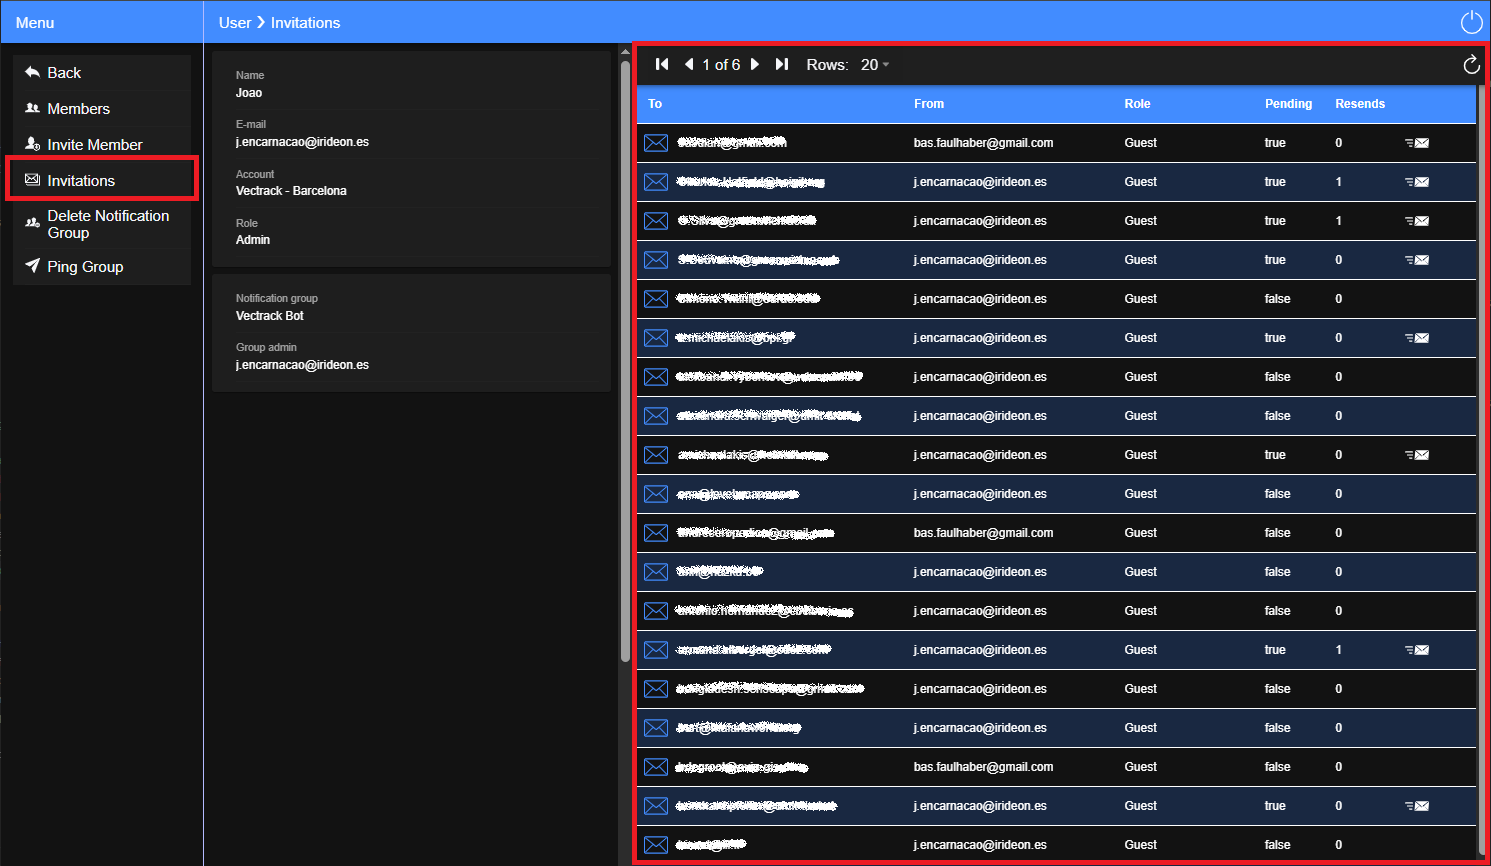
Invitations Panel
Purpose
Provide an overview of all user invitations associated with the current account and their acceptance status.
Description
The Invitations Panel displays a table containing all invitations sent from the current account. It enables administrators to monitor invitation status and resend invitations that are still pending.
Access
From the User Screen, select Invitations from the Main Menu.
Key Components
- Invitations Table: Displays all invitations associated with the current account and their current status.
- To: Displays the email address of the invitation recipient.
- From: Displays the name or email address of the administrator who sent the invitation.
- Role: Displays the role that will be assigned to the invited user when the invitation is accepted, such as Administrator or Guest.
- Pending: Indicates whether the invitation is still awaiting acceptance. The value is true when the invitation is pending and false once it has been accepted.
- Resends: Displays the number of times the invitation has been resent.
- Resend Icon: Displays an envelope icon that allows administrators to resend the corresponding invitation when required.
Only invitations with Pending = true can be resent. Once an invitation has been accepted (Pending = false), the user is already a member of the current account and the invitation can no longer be resent.
Create Notification Group Dialog
Purpose
Register a Telegram notification group for the current Senscape Viewer account to receive automated system alerts.
Description
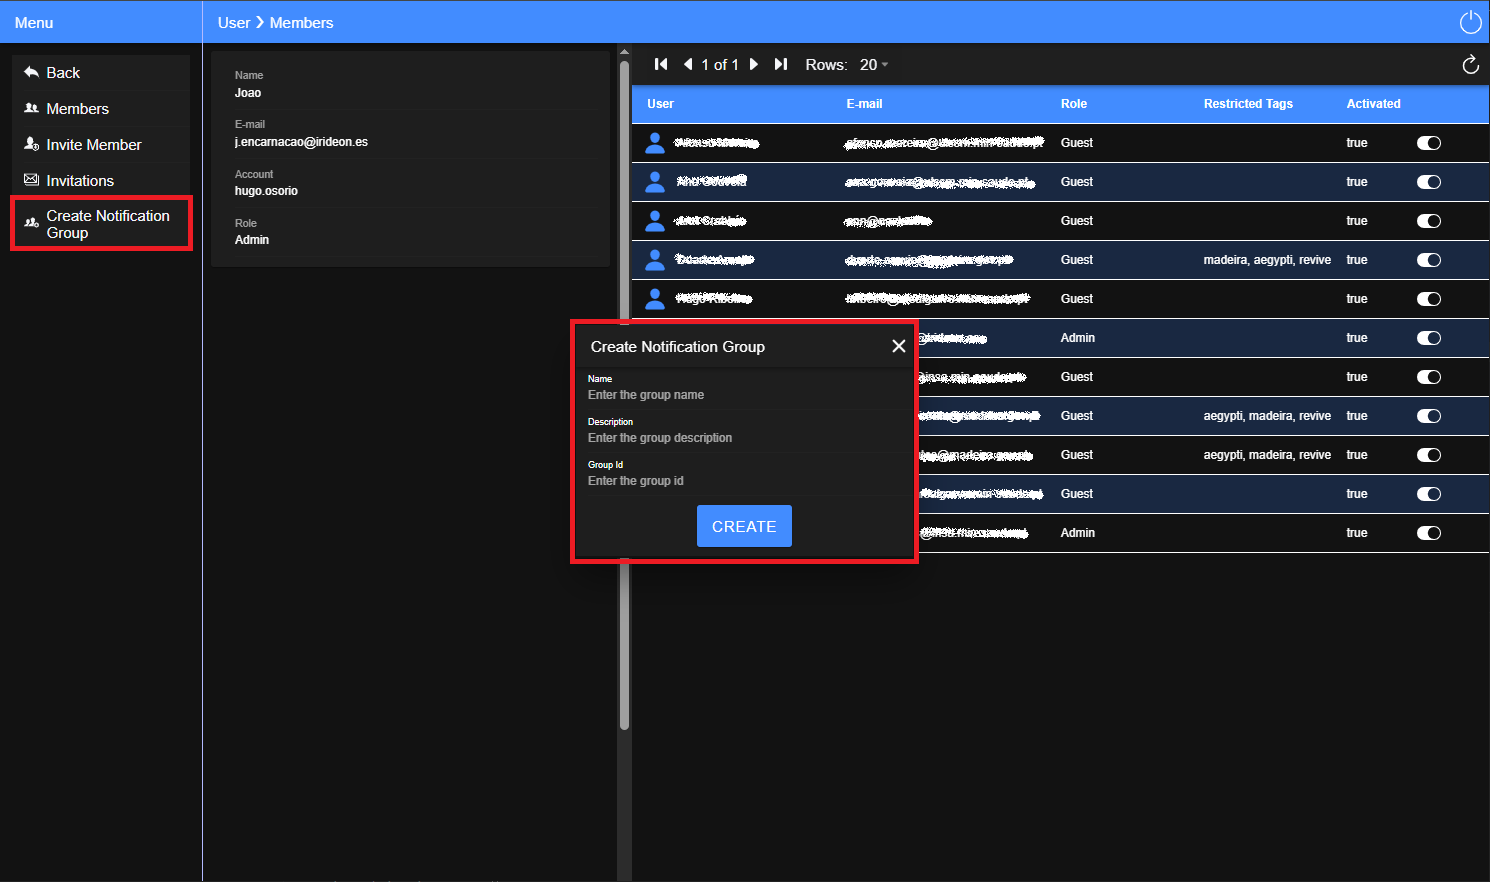
The Create Notification Group dialog allows administrators to register a Telegram notification group within the current account. Once registered, the group can be used by Senscape Viewer to deliver automated notifications and alerts to its members.
Access
From the User Screen, select Create Notification Group from the Main Menu.
Key Components
- Name: Allows administrators to specify the name used to identify the Telegram notification group within Senscape Viewer.
- Description: Allows administrators to provide an optional description for the notification group.
- Group ID: Allows administrators to enter the unique Telegram Chat ID provided by Irideon for the notification group.
- Create: Registers the Telegram notification group for the current account.
The Group ID is the unique numerical identifier assigned to the Telegram chat. This identifier is provided by Irideon. Please contact Irideon Support to obtain the Group ID before registering the notification group in Senscape Viewer.
Delete Notification Group Dialog
Purpose
Delete a Telegram notification group from the current Senscape Viewer account.
Description
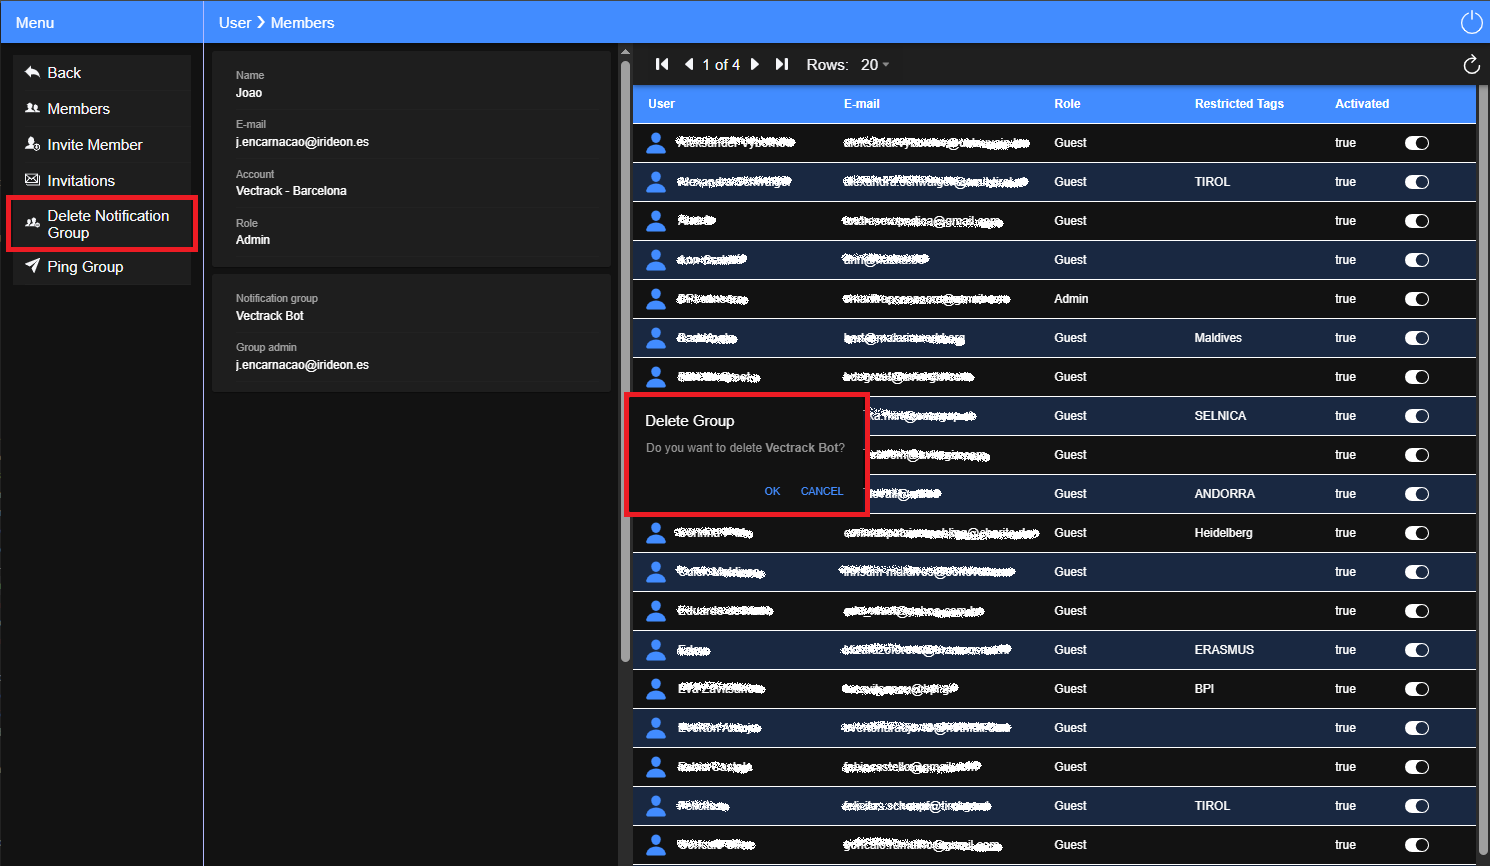
The Delete Notification Group dialog allows the Group Administrator to delete a Telegram notification group from the current account. A confirmation dialog is displayed before the group is deleted to prevent accidental removal.
Access
From the User Screen, select Delete Notification Group from the Main Menu.
Key Components
- Confirmation Message: Requests confirmation before deleting the selected notification group.
- OK: Deletes the selected notification group.
- Cancel: Closes the dialog without deleting the notification group.
Only the Group Administrator who created the notification group can delete it. Other administrators cannot delete notification groups created by another administrator, but they can use Ping Group and Join Group. Guest users can only use Join Group.
Join Notification Group Dialog
Purpose
Allow users to join a Telegram notification group configured for the current Senscape Viewer account.
Description
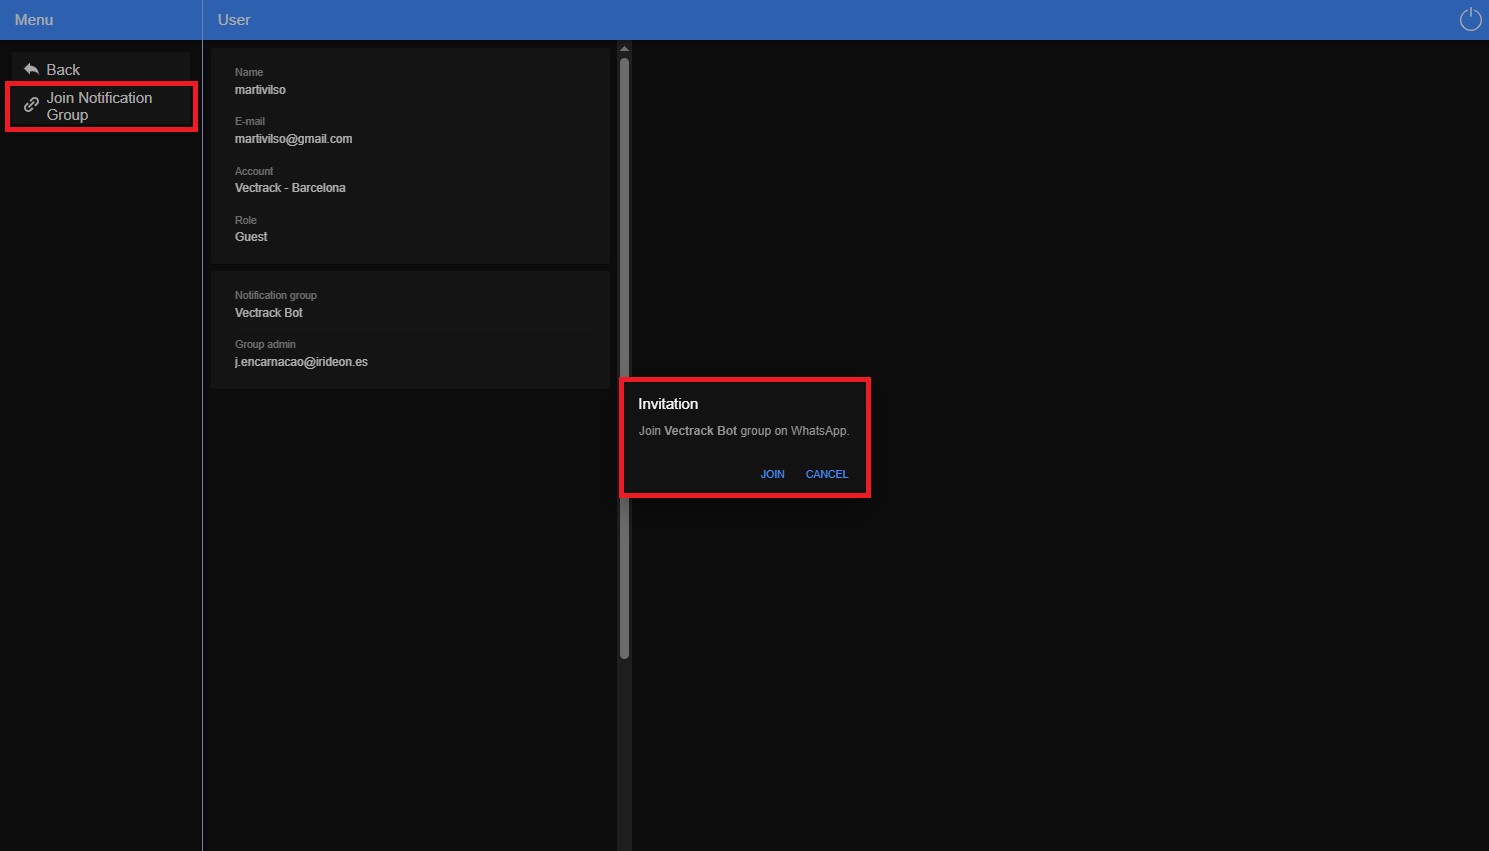
The Join Group dialog displays an invitation to join the selected Telegram notification group. Users can accept the invitation to become members of the group or cancel the operation without making any changes.
Access
From the User Screen, select Join Group from the Main Menu.
Key Components
- Invitation Dialog: Displays the Telegram invitation for the selected notification group.
- Join: Accepts the invitation and joins the selected Telegram notification group.
- Cancel: Closes the dialog without joining the notification group.
Both Administrators and Guest users can use the Join Group function to join Telegram notification groups configured for the current account.
Ping Group Button
Purpose
Verify that a Telegram notification group is correctly configured and able to receive notifications.
Description
The Ping Group function sends a predefined test message to the selected Telegram notification group. It allows administrators to verify that the group is correctly configured, that Senscape Viewer can successfully deliver notifications, and that all current members of the group can receive them.
Access
From the User Screen, select Ping Group from the Main Menu.
The Ping Group function sends the predefined message "Hi, I'm the Senscape Bot" to the selected Telegram notification group to verify that Senscape Viewer can successfully deliver notifications. Only users with the Administrator role can perform this operation.